Honours Project:
An Approach to Independent 3D Animation Production
Bachelor of Arts in Design (with 1st Class Honours)
Part 2 - Self-Reflective Case Study on the 3D Animation Process
Chapter 8 - Production and Post-Production
8.1 Environment 3D Modelling
8.1.1 Natural Outdoor Terrains
I began the production stage of the animation with the creation of the environments that would appear in the film. The visual reference used when creating these environments was the early illustrations I had completed, and the storyboard, as they included visuals of the each scene.
As the story was set in the natural environment of pre-nation Poland, the majority of the environments to create were outdoor terrains that included grassy planes, tree covered hills, and forests. Other scenes included an interior of a medieval dwelling with a desk upon which lied medieval items, a 3D map of Eastern Europe, and a model of an early Slavic fortified village. I would need to construct these scenes with a high quality on par with the 3D modelled face of the Lech character. Keeping up with the high standard I had set for myself was the main challenge I had to face at this time.
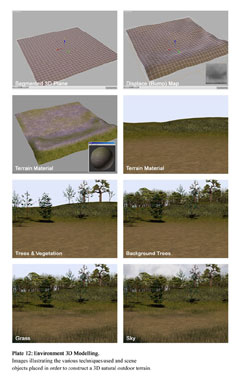
To create the outdoor scenes I firstly began with a plane object with a fair degree of segmentation. This allowed me to create the physical terrain of the environment with a high degree of polygon resolution and smoothness. To do this, I applied a displace modifier on the plane object and created a grayscale bump image of the terrain in Adobe Photoshop 5.5. When creating grayscale bump images, the lighter areas denote a raise in the surface, and the darker denote a depression in the surface. Applying the bump image to the segmented plane through the displace modifier, resulted in a 3D terrain with flat areas, hills, and valleys [Plate 12].
The next stage would be to create the material texture map for the terrain. I did this through using a plug-in named Terrain Material by Johnny Ow, which was included on the CD-ROM accompanying the tutorial book titled 3D Studio Max R3 f/x & Design (1999). Specifically design for what I was doing, the Terrain Material allowed me to combine and mix three separate image maps in one material, resulting in realistic looking terrain. The Terrain Material plug-in is also sensitive to height and slope depending on the setting. For example, one of the scenes I created had a dirt texture for the low flat ground, the slopes had a rocky texture, and the raised areas had a grassy texture, each of which gradually faded into one another. I used this tool in order to achieve such results, which on some occasions was quite time-consuming. Again, I created the single textures in Adobe Photoshop 5.5 sometimes based on existing images from the 3D Studio Max World Creating Toolkit R3 CD-ROM (1999).
 |
| Please click here to enlarge image |
|---|
The next stage after the completion of the base terrain model and material was to include greenery and vegetation [Plate 12]. I carried this out through placing pre-existing 3D models of trees, shrubs and plants in the areas in the scene I wished. The majority of these models were taken from an older CD-ROM named 3D Studio World Creating Toolkit R3 (1993). As some of these types of models were high in polygons, which resulted in high render times, I only used the amount that was necessary. For the vegetation in the background I used a technique that would result in less rendering time. I used simple object shapes applied with texture and opacity maps that were made to look like tree models. In some cases, I created my own vegetation 3D models from scratch, such as the grass I created in order to add greater detail to the environment, which was based on information in a tutorial Animated Grass by Hammes (2002, [Online]).
I also 3D modelled some of my own trees from scratch, as some of the pre-existing tree models were not enough. This was especially important in the creation of the oak tree, which played a central theme in the Lech, Czech & Rus film. I created the oak tree by first researching an appearance of an oak tree. I then created the truck and branches of the tree using polygon techniques, where I shaped a blocky mesh, smoothing with a mesh smooth modifier, and created models of the oak leaves. I then used a particle array modifier and emitter target object, to apply any number of leaves on the tree I wished. This too was based on information learnt in a tutorial, Tree Tutorial by Watkins (2002, [Online]).
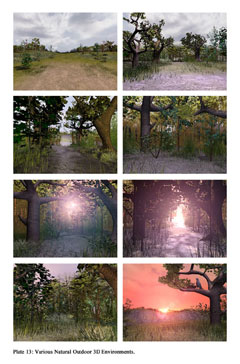
The sky in the scene was created by applying a high-resolution image that was based on a photograph and modified in Adobe Photoshop 5.5 onto the inside of a halved sphere. The sphere was then moved so to act as an umbrella, encompassing the whole scene. I then lit the scenes and set cameras according to the storyboard. I created as many as a dozen similar natural outdoor 3D environments, reflecting the scenes on the storyboard [Plate 13].
 |
| Please click here to enlarge image |
|---|
8.1.2 Other Environments
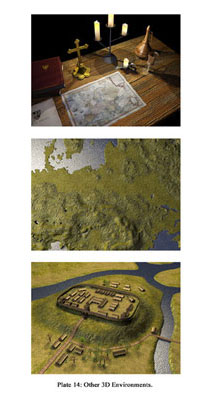
Once these natural scenes had been completed, the next stage was to create the remaining environments [Plate 14]. These included a 3D map of Poland, which was created in similar fashion to the terrain using a displace modifier, image and terrain material. This would be used to show migrational diagrams within the film of the three brother's journey. Another scene was an environment of an early Slavic fortified village, which would be viewed from the air. This proved to be quite time-consuming carefully, aligning and placing each object in the scene. One more scene to create was a medieval desk upon which lied candles, medieval items and a map, which would unravel, starting the story. This scene would be used at the beginning and end of the film. This was completed quite easily due to the fact that I had used this scene previously in the Smok Wawelski film, although this time more items on the table were created.
 |
| Please click here to enlarge image |
|---|
8.2 Character 3D Modelling
Once the scenes had largely been completed, the next stage to complete was the modelling of the characters, which I had already begun in the pre-production stage of the project with the 3D modelling of Lech's face.
8.2.1 Human Character Body Modelling
With the Lech's face largely completed, I began work on the creation of his body. Just like with the creation of the face, I was not starting the modelling the body from scratch, as I used the body of the characters from the Smok Wawelski as a base, thus saving much time and labour. Quite a lot of modification had to be carried out to the pre-existing 3D body model, as the modelling in the Smok Wawelski film was far more simplistic in style. Using the pre-existing model as a base, I set about to create far more detail within the model though polygon modelling techniques, elevating it to a standard on par with the high quality of the face.
The modifications that took place were the addition of creases in the shirt and trousers, realistic looking shoes with laces and straps, and the general appearance of the clothing and accessories one would have worn in that particular time period. This included items such as belts, buckles, bags, chain mail armour, capes, broaches, weaponry, swords, knives, spears, headgear etc. The 3D modelling and texture mapping of the various body elements were carried out in a highly detailed and precise manner, in the end taking a fair amount of time to complete.
Just as with the creation of the face, I also modelled and worked on only one half of the body of the character, creating a cloned instanced mirror for the other half. Whatever modification I did to one half of the face mesh, would also instantly appear and be mirrored on the other half. Just as I did with the face, when finished I welded together the two halves of the body objects, be it a shirt, or trousers into to one object. The visual reference used in the creation of the body were the initial character sketches that I had completed in the earlier stages, and the knowledge I had gained from the research conducted. The only models that I did not create, that were part of the final body were the human hands, which I acquired from the previously mentioned software program MetaCreations Poser 3.
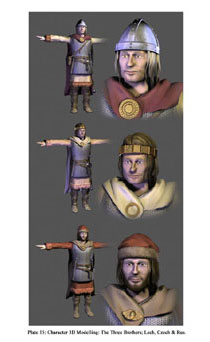
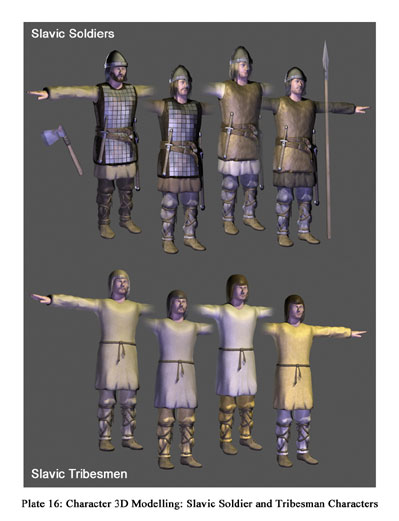
Just as the 3D model of Lech's face is the base for the other character's faces in the film, the 3D model of Lech's body was also the base for the other character's bodies in the film, although slightly modifying them, enough to be unique. At the same time that I was creating the bodies for the other characters; Czech, Rus, the soldiers and tribesmen, I was also creating the faces for each of them. In total, there were the three brother characters: Lech, Czech and Rus [Plate 15], four different types of soldier characters, and four different types of tribesmen characters [Plate 16].
 |
| Please click here to enlarge image |
|---|
8.2.2 Flattening the 3D Face Model
Note: I have used the single term face to refer to the polygon head/face of the character.
Whilst all the characters were being 3D modelled and textured, a problem with the 3D face model that first arose when conducting the early morphing experiments, was resolved. This was the problem of binding the many facial features which some of the characters had e.g. moustaches, beards, and even eye ducts, eyelids and eyelashes, to the actual face. This was in order to make one singular object so that facial animation could be easily carried out with one object, rather than many. This was especially critical for the three main characters; Lech, Czech and Rus, as during various scenes in the animation they would be shot close up by the camera, and would be required to move their faces in both showing facial expressions and moving their mouths to talk.
After various unsuccessful experiments and trials of flattening the modifier stack and compounding the objects, a way was found how to bind the face, moustache, eyelashes and eye ducts etc into one singular object without adversely affecting the modelling structure and texture mapping. The following information is a step-by-step description of the process that I followed in creating the singular face object for the Lech character.
As the face, moustache and eyelashes were all separate objects that were going to be combined into one, the important first step in carrying this out was to create a multi/sub-object material, which was one singular material that carried the maps for all objects of the face. This included a material for the face, moustache, eyelashes and eye ducts. The singular sub-object materials were applied to the relevant objects, through application of a material ID modifier, the numbers corresponding with the sub-object material number. The modifier stack order of face and moustache before the creation of the singular face object was; Editable Mesh (the base model), Material ID (used to apply the sub-object material), UWV Mapping (used to position the texture), and Mesh Smooth (used to smooth the polygon mesh).
The next step was to delete the mesh smooth modifier on each facial object, and then convert each facial object into a single editable mesh, or collapse their modifier stack (these two methods resulted in the same outcome). This would create an editable mesh base model with the applied and placed texture map ingrained. The texture map material ingrained into the mesh would allow me to animate the face in a way that when the mesh is moved, the texture map will move with it.
Once this process was completed for each of the facial objects, the next stage was to select the base face model and create a Boolean compound object from it, binding the various facial objects together through union. It was very important to move the moustache, eyelashes and eye ducts away from the face so that they were not touching, in order for the compound to work without adversely effecting the mesh structures. Once each facial object on the face was attached through union, the compound object was then converted to editable mesh. When this process was carried out for each facial object; the face, moustache, eyelashes and eye ducts were all one singular object. I then applied the mesh smooth modifier to smooth out the singular model and through entering the sub-object level and selecting the vertices, moved the attached moustache, eyelashes and eye ducts back to where they were originally placed, touching the face.
8.2.3 Boning and Skinning the Character Models
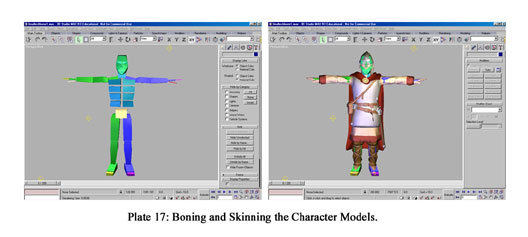
The next stage after the completion of the modelling of the characters was to bone the characters so they could be animated. Boning is a technique where a range of objects linked through hierarchy, set out corresponding with the mesh structure of an object, is placed within its framework, mimicking the affect and mechanics of bones within a skin. The bones are then bound to the skin, resulting in movement and animation being able to take place, depending if the settings are correct. By moving the bones, the skin that is bound to it moves also, much like bones in the human body. Protrusion of any bone through the skin is resolved by the fact the bones can be set to appear invisible in the final render.
Instead of creating my own set of bones from scratch I used a 3D Studio Max plug-in named Biped, which is part of the 3D Studio Max add-on software Character Studio R2. Biped offers a ready made and linked boning system for humanoid figures. All that was needed to do was create the biped skeleton and precisely set it within the mesh of the character's bodies that I had created [Plate 17]. For all the human characters in my project, I only needed to set one skeleton within one of the character's mesh, and copy it for all the other characters. The reason for this was due to the fact that all the figures I had modelled were positioned in the exact same area in the 3D workspace, and had almost identical dimensions as they were created from the same base model. The character's bodies were also modelled with their arms outstretched to allow for easier setup of the bones system.
Once the skeleton was set within the skin of the character, the next stage to do was to select which parts of the body mesh I wished to bind to the bones, so to be affected by them. The selected objects consisted of the basic body such as the singular head/face model, shirt, arms, hands, legs, and feet. The other objects not directly attached to the body structure such as the hair, helmet, belts, capes, bags, and weaponry etc, would not be bound to the bones structure, as it would give adverse results. For example, if a character's leg bone were moved in order to bend it, one would not want the sword to bent also. The objects not directly attached to the body structure would be linked with the aide of dummy objects to the body, so not to be affected by the boning system therefore keep their form. If needed to be, these separate objects could be animated manually.
With the main body parts selected that I would want to be attached to the bones, I then applied to them a Physique plug-in, which is used to attach the selected skin objects to the bones, by selecting the root node (central bone of the biped skeleton). The Physique plug-in is also part of the 3D Studio Max add-on software Character Studio R2.
Once this was completed I had to adjust each envelope in each bone so that it would encompass and only affect the skin it corresponds with, not affecting or touching other parts of the mesh. This was quite time consuming, especially due to the fact that I had to carry this method out for every major bone in the skeleton, and test if the movement would work in a desired way. I also had to do this for every single character. As the characters were almost identical in dimensions, I listed down on a chart each envelope setting from the first character I boned. I then applied the same settings to each character, only needing to type in the correct numbers in the interface. Once the boning of the characters was completed, they were now ready to be animated.
8.3 Modelling Remaining Objects
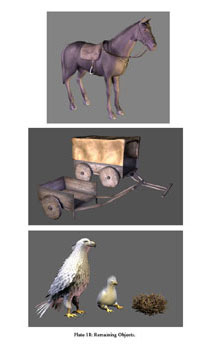
As the characters were now ready for the animation stage, I began to model the remaining objects for the film [Plate 18]. These included the creation of the final horse model, horse carriages, an adult and baby eagle with nest, and items such as a tent and a campfire, which would be used for one of the scenes.
As mentioned previously in the section; 7.10.2 Experiments in Animating a Horse, I used a pre-existing 3D model from the program MetaCreations Poser 3. I enhanced the pre-existing model by applying texture maps to the various parts of the horse's body, in the end creating three different coloured horses for variation. Working from visual references, I also created accessories such as a saddle, reigns, stirrups, buckles and straps, using polygon modelling techniques.
 |
| Please click here to enlarge image |
|---|
8.3.1 Boning and Animating the Horse
One of the most important problems to solve in the animation production process was to find out how to animate the horse. Earlier on in the animation process experiments in how to animate the horse, first by trying to use an existing boning system and then using linkage and inverse kinematics using parts of the horse mesh, failed miserably. See section: 7.10.2 Experiments in Animating a Horse.
It was now time to finally solve this problem once and for all. From the experimentation and my past experience, I came to realise that the only way that I could animate the horse with a realistic movement was through boning. Though this time I would have to attempt to create by own bones system for the horse from scratch and hope that somehow I could pull it off.
The first step was to create a skeleton for the horse that corresponded with the framework of the horse's skin, through using simple box shapes stretched and scaled to the required dimensions. Once the horse's skeleton was complete and positioned adequately within the mesh framework, I then selected the mesh that I wished to be affected by the bones and applied the physique plug-in to the selection so to bind the bones to the skin. To my great joy and surprise it worked! The simplest way to bone a horse happened to give the most affective results. I then adjusted the envelopes so that the bones corresponded with their correct area of mesh. There was absolutely no guarantee that my own boning system was going to work, but to my great relief it did.
Once I had linked the saddle and other horse equipment to the bone structure with the aid of dummy objects, I could then and set about animating the horse. I created two animation loops for the horse; a walking motion, and a galloping motion, as they were the two motions required for the film, according to the storyboard. In order to create believable fluid horse movements, I would use the roto-scoping technique. Roto-scoping is where live video footage of movement is transferred or traced to a character through key-frame animation. The video footage that I based my horse movement from was from the historic Polish film Potop (The Deluge) (1974, [motion picture]).
I originally feared that I would have to settle with third-rate horse movement resulting in the failure of the film from a technical animation level. Though the roto-scoping and animating of the horse movements were quite a time-consuming process, it paid off in the end, with the movement of the horses turning out far beyond my low expectations.
8.3.2 Modelling the Eagle and Remaining Objects
Once the modelling, boning and animation setup of the horses was largely completed, I then set about modelling the remaining 3D models [Plate 18]. This included the creation of the eagle, baby eagles, and nest, which would play a central role in the film. To model the eagle I firstly researched and collected imagery of eagles from a variety of sources and then began creating the model through polygon modelling and texture mapping. Initially I only created the eagle model with its wings closed, as on the original conceptual storyboard I purposefully did not show the bird in flight due do the difficulty I would encounter when modelling and animating. Earlier attempts at creating the eagle model with the capability to open and close its wings failed, due to the fact that I did not have the resources or time to properly research the mechanics of how a bird opens, folds and closes its wings.
Later on with the creation of animatic, discussed in section; 8.7 Creation of the Animatic, I decided that the eagle sitting in a static position on the oak tree branch during the animation would just not be enough. After viewing the animatic, I decided that I would have to include the flight of the eagle, and display the eagle perched on the branch, with its wings spread.
As I did not have the capability to create this level of movement in one eagle model, I decided to create another eagle model, which was modelled with its wings open and spread, having capability of wing movement and flight. This meant the first eagle model could be used in scenes where the eagle is perched sitting, and second model could be used in scenes that require the eagle to fly and spread its wings. This decision was very important due to the fact that the Lech, Czech & Rus legend is also representative of the founding of the symbol of Poland. As the illustration of the white eagle on the Polish emblem does have its wings spread, I would have to present this pose in the film.
The only remaining 3D models that needed to be created before I could begin the animation stage of the film were the horse carriages, which I created with basic 3D shapes, polygon modelling techniques and texture mapping, and objects for the scene of the film I would be creating first. This included creating an early Slavic tent and a simple campfire.
8.4 3D Animation
As the vast majority of the 3D modelling was completed, the animation stages were now able to commence. The output of the animation would be for the standard 3 x 4 dimensions of PAL television and video. This means I will be animating using 25fps (frames per second), and rendering frames with the dimensions of 768 x 576 pixels at 72 dpi (dots per inch - PC screen resolution).
The main reference used when animating the scenes was the storyboard and synopsis. Though generally the completion of the scenes were a very relaxing and loose process, undertaken freely and joyfully. When completing the scenes it was more useful to make them as long as possible rather than short so that I would be able to cater for fades and easily trim unwanted footage.
Each scene was worked on one at a time and in no particular order. As several scenes were animated and completed during this process, and due to the similarity of them, I shall only discuss the processes and methodology of the creation of two scenes in particular. Many of the other scenes completed were also created with the same techniques that will be discussed.
8.5 3D Animation Case Study: The Camp Scene
8.5.1 Initial Scene Setup
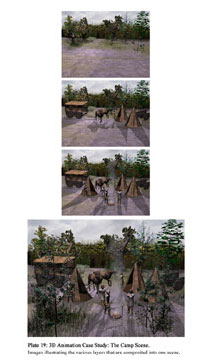
The first scene I created was the camp scene, which would show the Slavic tribesmen gathered at their campsite, which they would have set up, at the end of a long day of travelling [Plate 19]. The scene would include a very slowly zooming-in camera towards the campsite, focused on the tents, the resting horses and tribesmen. As I wanted to create interest and a certain amount of detail, every live object in the scene would be moving in some way. For example the horses would be moving, one of the tribesmen would be walking out of his tent, one would be poking the campfire with a stick etc, another would be standing neat the campfire folding his arms and motioning with his head as though he was talking etc.
 |
| Please click here to enlarge image |
|---|
As the environments were already completed, I loaded the finished natural environment in which this campfire scene would be set, and entered the amount of frames that would be needed. In this case the scene would consist of 300 frames, which is equal to 12 seconds long. I also set up the slow zoom of the camera at this time, an element that I would adjust and refine throughout the creation of the scene until it was complete.
I then imported the static objects that would appear in the scene such as the campfire, tents and horse carriages, and placed them in the precise places I wanted them to be. For the flames of the campfire, I would apply a lens effect glow to an invisible object through utilising the video post menu. I would then set, coloured and animated the glow until it resembled flames from a fire. For the smoke I used a ready-made particle emitter and material that I originally used in one of my animation project in 3rd year. The elements originally come the CD-ROM accompanying the tutorial book titled 3D Studio Max 2 Effects Magic (1998). At this time I also adjusted the position of some of the tree and grass models, especially in the foreground so that they would not be in the way of the central action area.
8.5.2 Using Alpha Channels
At this stage the scene was becoming quite large in file size, cumbersome to manoeuvre, and quite slow to render, due to the large number of polygons and faces the many objects in the scene had. This brought to my attention that once the detailed tribesman characters and horses were also imported into the scene, it would become way to large in both file size, and render time. It was at this stage that I began to consider other options of how to construct the scene.
Instead of packing all the objects into one scene, which would have been too much the computer to handle, I decided to construct the scene though making use of alpha channels and compositing, something that I had never undertaken before. Constructing the scene in this manner would mean lower file sizes, less clutter, more manoeuvrable 3D work space, and much faster render times. Using this method meant that the one scene would consist of a few different layers, with different objects on each. Each particular layer would be rendered out using an alpha channel, and when combined together in a compositing program, the full scene will be presented. This particular scene will consist of four different layers and therefore four different 3D Studio Max files. The following describes the four different layers:
- Layer 1) Solid background layer consisting of the ground and background trees.
- Layer 2) Middle ground objects such as tents, carriages and horses.
- Layer 3) Middle ground objects such as a tent, tribesmen and the campfire that are situated in front of Layer 2.
- Layer 4) Foreground layer consisting of trees, shrubs and grass.
[Plate 19]
Layer 1 will be rendered as a regular sequence of .jpg (JPEG) files, set to the highest quality compression. In Layers 2, 3 and 4 however, the objects within the scene are lying upon a special alpha material that is applied to the sky, ground and background objects. The colour chosen in this case was 100 gray. These layers are rendered with an alpha channel background and saved as a sequence of .png (Portable Network Graphic) file, as that file format is capable of embedding an alpha channel.
Once the .png files are loaded in a compositing program such as Adobe After Effects 4.0, the particular alpha channel colour would be chosen, causing that particular colour within the files to appear transparent. Once the files are combined and layered on top of one another in the correct order of distance, the entire composited scene will be presented.
One of the most important points in using alpha channels in order to composite a scene, is that each object in each individual layer, has to be positioned in correct relation to each other, in order to avoid collision of objects when composited. Simple shapes could be used as a reference guide representing the objects in other layers during scene layout. Another important point is that the camera has to be positioned at the exact same place, and moved in exactly the same way on every on every layer, as if there was just one singular scene. As the initial alpha channel tests were successful, I decided that I would use alpha channels and compositing for the majority of the scenes, cutting down file size and render times.
8.5.3 Importing and Positioning of Scene Objects
As all the static objects were placed into the camp scene, the next stage was to import the horse and tribesman characters. Though before the importation of these objects could take place, I would firstly need to animate them in separate scenes. As the horses and human characters were all ready boned, I could carry this out straight away.
The horse animation for this scene consisted of two horses moving about, stomping their legs, swishing their tails, bobbing their heads etc, with a tribesman holding one of the horse's reigns and tending to him. This was done relatively quickly and the objects were imported into their particular layer of the scene. The horses and tribesman was then positioned within the scene by attaching a dummy objects to each of their root nodes (central bone of the skeleton). This was important as the movement of the position of the character is done through moving and rotating the linked dummy object. The two tribesmen that would be situated around the fire were then animated, imported and positioned in their particular layer, so too, was a soldier that would be keeping guard to that section of the camp.
8.5.4 Animating a Character's Walk
The next segment of animation to carry out for the camp scene was to animate another tribesman that would walk out of his tent toward the campfire. The basic walking loop animation that I would create for this particular character would also become the walking action for the rest of the characters. This would be possible as the biped plug-in has the ability to save animation movements, which then can be applied to other skeletons. This proved to be one of the most challenging and time consuming tasks in the production process. The animation technique is use to create the walk movement was key-frame animation; indeed it was the style of animation that I had used throughout the film.
The key-frame animation I conducted can be described as where differing degrees of an object's movement is set at various points along a time-line. Once two movements are set, with a certain amount of space between them, in-betweening takes place with the computer filling in the gap, completing the movement. The following is an example of key-frame animation. At 0-frames the character's arm is set at its side, and at 50-frames the arm is set in the air. As a result of in-betweening, when the 50-frame animation is played, the animation would show the character's arm actually moving up from its side, into the air.
I used key-framing techniques, as opposed to other animation styles such as motion capture, due to the fact that I was in full control and animating for real. See section 2.1.5 A Philosophical Definition and Discussion of Animation, for a philosophical discussion of the motion capture technique. Most of the pre-existing motion capture files I had available were of no use to me, plus they may have been copyrighted. The biped plug-in also offers ready-made walks but I did not use these, again due to the fact that I wouldn't be in full control.
The visual reference I usually use as a guide when creating a walk motion for a human character, are the step-by-step illustrations featured in The Animator's Workbook by White (1988, pp. 44-63). This time was no different. These illustrations show the major steps and changes in position of the legs and arms that occur during a walk cycle. I then set about animating the walk motion on the characters biped skeleton using key-frame techniques.
The process was quite challenging time-consuming in the fact that if the walk was not up to scratch I had to modify it until it was. I needed to animate the walk movement on this particular character as perfectly as possible as it would be used by all the characters in the film. Some of the walk cycles I initially animated were either too fact, too slow, the steps were to wide, or the walk was too cautious and elaborate. After much modification and testing I had finally created a seamless walking motion cycle that I was pleased with. Once completed I saved the biped animation movement as a .bip file, so that I could apply that same movement to any human character's biped skeleton in the film if I chose to do so. I saved every human character biped animation I created, as a .bip file.
Once the walk cycle was completed, the next stage was to copy the key-frames a number of times, as the original loop I had created only consisted of two steps. Once the key-frames were copied over number the frames needed, a dummy object was attached to the node root (central bone of the skeleton) which would allow the character to be positioned. The tribesman character was then imported into the camp scene.
Positioning the character along the path in which it would walk proved extremely tedious and time-consuming, as the character had to walk out of its tent, along the slightly hilly terrain towards the campfire. The character had to be precisely positioned, every 5 frames, through moving the dummy object, so that the character's walking footsteps would be meeting the terrain surface in a realistic manner. After positioning the character along the walk path was completed, I then edited the animation so the character stopped walking and stood still when he reached the campfire.
8.5.5 Lighting and Shadows
The lighting for the camp scene was positioned and set in a way that would reflect the time of day that particular scene was set. All the outdoor scenes in the film followed this pattern. In this case, the scene was set in the late afternoon when the day was coming to an end. For the outdoor scenes only one light source was set to cast shadows, reflecting real life lighting, as the only natural source of light and shadow during the day is the sun. The other lighting was ambient light used to lighten various parts of the scene without casting shadows.
The type of shadowing that was used was Ray Traced shadows, these being the most realistic and detailed shadows available, there only down point is that they can take a while to render. The time factor was not really an issue in this case, due to the fact that I divided the scene into four different layers cutting down on objects and render time. The alpha material that covered the ground was also able to capture the shadows so that they would be able to appear in the final composition.
8.5.6 Rendering, Compositing and Output
With the camp scene largely completed it was time to render each of the four separate animation layers, each of which were 300 frames, equalling 12 seconds long. As described previously, the solid background layer was output as a .jpg sequence of images, and the remaining alpha channel layers were output as a .png sequence of images. The dimensions of the rendered images resolution were 768 x 576 pixels at 72 dpi (dots per inch), the correct settings for PAL television and video.
I then imported the rendered image sequences into Adobe After Effects 4.0, placed them in the workspace, composited the layers together in the correct order, and previewed what the finished scene would look like. This was the process undertaken for a large majority of the scenes. At this point when each scene was composited, I added a background music soundtrack that I acquired from various historical films that I thought would be appropriate.
I used these sounds as a guide to what style of music I would need to create for the final film. Once a musician is commissioned, he or she would be able to compose a music soundtrack in a similar style without copyright problems. Once the scene was fully composited in Adobe After Effects 4.0, I rendered out the final scene as a .jpg sequence, set to the highest quality compression, and rendered out the sound as an .avi movie.
I then used a video-editing program named Adobe Premiere 4.2 and imported the final .jpg image sequence and sound file. I placed the images and sound in the work space, and created an .avi file using the Truevision Bravado 1000 video card and CoDec, which is designed for PAL television output. Once rendered, I played the finished .avi video sequence. The movie was output from my computer to a VHS video recorder, which displayed the film on a television video monitor situated next to my computer. This also allowed me to record the animation on videotape if I wished to do so.
By outputting the animation to video and displaying it on a television screen, I could properly see the film in the format it was intended for. It is important to note that the animation looked superior on a television screen rather than a computer monitor due to the fact that the rendered frames and frame-rate were designed specifically for PAL television and video. The colours and imagery in the film also looked superior, sharper and more vivid on the television screen that a computer monitor due to the resolution and gamma of the PAL television screen. This was the typical process undertaken when testing the scenes once completed and rendered.
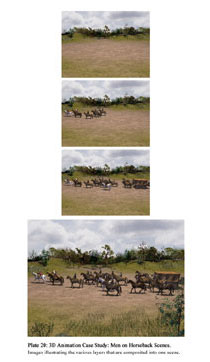
8.6 3D Animation Case Study: Animating Scenes with Men on Horseback
The next scenes completed would be the scenes at the beginning of the film consisting of the human characters riding upon their horses through the natural environments [Plate 20]. I firstly positioned the human characters upon the horses back, linked them, and animating their bodies in respect to how a human would move when riding a horse e.g. bobbing up and down and holding the reigns etc. I animated two human movements; one when the horse was running, and one when the horse was walking.
 |
| Please click here to enlarge image |
|---|
Once I had animated one of the characters, I then saved the biped motion as a .bip file, and applied it to the rest of the human characters that would be riding horses. As some of the soldier characters were holding spears whilst they were riding, I had to adjust the original motion accordingly. Another problem that needed to be overcome was to animate the capes of the three bother characters; Lech, Czech and Rus, so their capes would be flapping in the wind whilst they rode. After a degree of experimentation I successfully managed to animate the character's capes with pleasing results. At this stage I also prepared the horse carriages, placing and linking tribesman characters upon them. I then linked the carriages to the horses and animated the wheels and carriage motion. The carriages would not appear in the scenes where the horses are galloping, only in the scenes where the horses were walking.
After each human character was linked and animated upon the horse, dummy objects were attached to each of the horses, allowing them to be positioned in the scenes when imported. In total I had animated the three brother characters; Lech, Czech and Rus, four soldiers, and four tribesmen, riding upon horses of differing colours, both running and walking. I created enough variations so that every character and horse would appear slightly different in the film. Once finished I copied the key-frames of the horses and characters to the amount I wished, and imported them into the relevant scenes.
Before positioning the men on horseback within the scenes, I selected their key-frames and adjusted them so that each horse would be stepping in a different pattern, rather that in unison. I did this on order to create a degree of realism. If all horses moved their legs at the same time, in the same phase, it would not look right. I would also carry this out later, when animating scenes were more than one human character was walking, making sure that each character was walking at different phase.
For all the scenes that included a group of men on horseback travelling through the natural terrain, I would especially have to make use of the alpha channel and layer compositing technique I had perfected in the camp scene. This is due to the fact that there would be an incredible amount of 3D models that would have to be placed into one scene. For instance, one such scene would show part of the whole tribe travelling from a distance across a natural countryside environment, which would consist of sixteen men on horseback, four carriages, and various other characters and horses. It would be impossible to fit all of these highly detailed 3D animated models into one scene, due to limitations in memory and processor speed. Rendering time for a scene so heavily laden with objects and polygons such as this would also have been astronomical. The only way to create such scenes was to divide the scene into manageable layers and make use of alpha channels and compositing techniques.
I used the same principles to set up the men on horseback scenes, as in the camp scene. The background consisted of a solid layer, with the other layers consisting of an alpha channel background with no more than four men on horseback on each. I also carefully referenced the objects in the scenes so there would be no collision of objects once composited. Some men on horseback scenes proved to be so large that they consisted up to ten separate layers [Plate 20].
The horse scenes were one of the most time-consuming and laborious parts of the entire animation process, though the final results were the most rewarding. Just like in the camp scene where I positioned the character every 5 frames so its feet would meet the terrain the correct way whilst walking along the path, I also had to do the same for the men on horseback scenes. Once the desired path was set, I had to position the horse so that its legs would be meeting the ground in the correct way. I had to carry this out for every single horse and used a visual reference that I created which showed a side-on view of a horse running cycle, illustrating the position of the horses feet in relation to the ground. In some cases I had to redo some of the horses so that their movement along the path was at the correct speed for their leg movements, as sometime the horses appeared to be moving to slow, for their fast leg movements. As I completed each scene involving men on horseback, I rendered out the various layers. Then using the same processes that were described previously, I composited them in Adobe After Effects 4.0, added sound as a guide, rendered them, and using Adobe Premiere 4.2 output them to television and video.
The various range of processes and techniques learned and carried out in the two scenes described in the 3D Animation Case Study's, would be very similar for the process carried out in the other scenes that I would complete. Once I had completed and rendered half a dozen scenes, including the camp scene, several horse scenes, the opening scene and a rough opening title sequence, the next stage carried was the creation of an animatic.
8.7 Creation of the Animatic
An animatic 'is generally used to describe a film, video, or computer-based presentation of the still drawings that comprise a storyboard' (Laybourne 1998, p. 105). Laybourne (1998, p. 105) also points out that the element that turns a storyboard into an animatic is duration. An animatic should be correctly timed and be the same length as the intended final animation. Another important addition an animatic has to a storyboard is that it includes a soundtrack.
To create the animatic for my animation project I used both the images in the storyboard and the scenes that I had rendered. The soundtrack I created included music from various films which would be used as a guide for the final soundtrack, as explained earlier. Films that I acquired this background music from included; The Slavs (1984, [video recording]), and Ogniem i Mieczem (With Fire & Sword) (1999, [motion picture]). The sound of the galloping horses that appear in the men in horseback scenes were taken from; Potop (The Deluge) (1974, [motion picture]).
One of the most important additions to the soundtrack at this stage was the inclusion of the narration of the film. Using the story / narrator's script and storyboard as a loose guide, I carefully read out each part the story, recording myself with a microphone. I then edited and cut up the sound file separating it into phrases that corresponded with each particular scene. It was my original intention to use the proper narrator's voice that would be used in the final version of the film, but due to time constraints I had to settle for my own voice. Later on, I would use the proper narrator's voice for the presentable prototype of the pilot.
The software program used to create the animatic was Adobe After Effects 4.0. After importing all the image and sound files into the program I set about constructing the animatic, placing the various scene elements in the work area. The animatic was useful for showing what cinematography elements I intended to use for final film. I was able to show transitions such as fades and cuts between scenes, and panning and zoom movement of some of the still frames to show what desired camera movement I would want in the final animation. Partly with the help of the storyboard, I decided that a 2-second fade transition would be used between scenes to signify that a certain amount of time has passed. For scenes where no time had passed, there would be no such transition between them, only a straight cut from one scene to the next. Both of these were illustrated in the animatic. When the animatic was completed, I rendered out the images as a .jpg sequence, and the sound as an .avi movie. I then imported these files in Adobe Premiere and output the animatic to video.
As I used the storyboard as the main guide for animating the film, I would use the animatic as a guide for compiling all the scenes for final version of the film. The animatic gave me new ideas for the film and helped me identify changes that needed to take place, such as including the eagle flying and perched with its wings spread, which was mentioned previously.
The last scene produced before I had to put the practical part of the project on hold due the time demands of the theoretical component of the Honours project, was a scene in which the brothers were about to embark on their quest into the forest. The majority of the scene used techniques and methodology discussed previously, such as alpha channels and animating the characters walking over terrain. The one technique that needed to be implemented that I had only experimented with was morphing. This needed to be included in this scene, and other scenes that would need to be completed in the future, as the three brothers; Lech, Czech and Rus, would be speaking to one another. Morphing and lip-sync animation will be discussed in detail in the following section.
8.8 Morphing and Lip-Sync Animation
Note: I have used the single term face to refer to the polygon head/face of the character.
I experimented with morphing earlier on in the animation process, which is discussed in section 7.10.1 Facial Animation and Morphing Experiments. Due to the fact that the three brother characters; Lech, Czech and Rus would be required to speak during the film, a more thorough investigation of the morphing technique needed to take place.
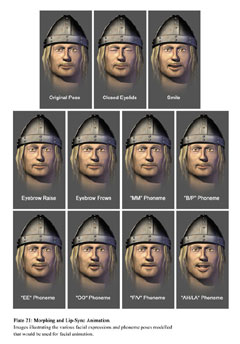
I firstly opened the 3D Studio Max file of Lech's singular 3D head/face model in which all the facial objects were unified as one mesh. I then cloned ten copies of the face in the same scene. Each copy would have a different facial expression or phoneme pose added to them by way of polygon modelling [Plate 21]. The reference used for creating the different phonemes was the tutorial book 3D Studio Max 3 Professional Animation. The book gives quite detailed information on the anatomy of the face and illustrates which muscles are responsible for each facial movement. It also illustrates and outlines the different types of phonemes one should model when preparing for facial animation and morphing. The book states that phonemes are 'the most basic phonetic building blocks of words', and that 'phoneme poses are the facial positions that represent the sounds used in form words' (Jones et al. 2000, p. 239).
 |
| Please click here to enlarge image |
|---|
Out of the ten copied faces, the facial variations I modelled were as followed:
- Eyes closed
- Smiling face
- Raised eyebrows
- Frowned eyebrows
- "MM" phoneme
- "BP" phoneme
- "EE" phoneme
- "OO" phoneme
- "FV" phoneme
- "AHLA" phoneme
[Plate 21]
The original face was of course left in a relaxed, expressionless pose as it already was. Once modelling of the different facial poses were completed on each of the ten copies, I then applied a morph modifier to the original untouched face. I then attached the ten modified faces (morph targets) to the original face through the morph modifier, in the areas designated. Once the ten faces were attached to the original face, animation is controlled by a number of sliders that allows each facial expression to morph into one another in a seamless and smooth way. By creating the facial expressions and phonemes I could give life to the characters face and be able to animate speech through lip-sync animation, which will utilise the phoneme poses.
The experiment I conducted to test the full effectiveness of animating facial expression and lip-sync through morphing was to animate the character speaking. Firstly I recorded my own voice speaking Polish, as the characters would be speaking Polish in the film. I loaded the sound into 3D Studio Max file and set it on the time-line. I then used the morphing sliders to slowly animate the mouth talking through key-frame techniques; the phoneme poses matching the sounds of the recorded voice soundtrack. I also manually animated the separate objects that were not part of the singular face mesh such as the teeth, gums and tongue, according the phoneme poses and position of the mouth. I also animated other movements such as blinking of the eyes, and movement of the eyeballs, which was controlled by moving the linked dummy objects that had the look-at controller applied to them.
Once I had completed creating the different range of facial expressions and phonemes for Lech's face, and thoroughly experimented with morphing and lip-sync animating, I then undertook the same process of creating a different range of facial expressions and phonemes for both the other brother characters; Czech and Rus.
Originally I was not going to use morphing in fear of it being too difficult. Though in the end through experimentation and help from reference materials, I found that morphing was a lot easier than I had originally expected. The only difficulty of the morphing process was that it was very time consuming, especially in creating the range of different facial expressions and phoneme poses, and actually conducting lip-sync animation.
8.9 Creating the Presentable Prototype
The construction of the presentable prototype of the pilot episode Lech, Czech & Rus, was the last stage in the practical component of this Honours project. As only the first segment of the scenes in the film where fully completed and rendered, I decided that the presentable prototype would consist of the first two minutes of the film. The presentable prototype will conclude with a 'To be continued…' acting as a teaser to the audience. Roughly corresponding with the scenes displayed in the storyboard and animatic, the following are the scenes that would appear in the presentable prototype:
1) The title sequence in which the Legenda, and Lech, Czech & Rus titles appear.
2) The unravelling map of Europe on the table, that the camera zooms into.
3) A side-on shot of the three brothers and their tribe riding their horses, galloping through the
countryside, passing the camera.
4) A front-on view of the three brothers and their tribe riding their horses, with the camera slowing zooming in.
5) An individual close-up view of Lech riding with the camera slowing zooming in.
6) An individual close-up view of Czech riding with the camera slowing zooming in.
7) An individual close-up view of Rus riding with the camera slowing zooming in.
8) A front-on view of the three brothers and their tribe riding their horses (the same as 4), with the horses riding towards and past the camera.
9) A wide shot of the entire tribe travelling on the horses through the countryside.
10) A close-up shot of the entire tribe travelling on the horses through the countryside, the horses moving past the camera.
11) The camp scene with the camera slowly zooming in on the tribesman and campfire.
12) To be continued.
13) Credits.
Using the animatic as a guide I then precisely placed these completed scenes in Adobe After Effects 4.0 in the appropriate places, and applied the relevant transitions. For the presentable prototype I decided to use a new, background music soundtrack which I found on the CD-ROM accompanying the May, 2003 issue of Computer Music magazine. This track was medieval-style theme music, well suited to the story being told. I have emailed Computer Music to contact the composer of the music Simon Smith to discuss the possibility of using his music in a public release version of my film, and am currently waiting for a reply. I have included the soundtrack in the presentable prototype of the pilot as an educational exercise only. Failing making contact with Simon Smith, I have already discussed the project with a local composer who is interested in producing the music soundtrack in a similar style.
In total I used three sounds for the presentable prototype of the pilot. The title sequence sound was taken from the film Ogniem i Mieczem (With Fire & Sword) (1999, [motion picture]), the sound of galloping horses was from the film Potop (The Deluge) (1974, [motion picture]), and the main background soundtrack was Simon Smith's composition, just mentioned. The sounds that would appear in the presentable prototype of the pilot are listed in the credits of the presentable prototype, as well as other references such as the origin of various the 3D models and textures.
Once the music and sound effect elements were placed in Adobe After Effects 4.0, there was one more task to be undertaken before the presentable prototype could be rendered and output to video; the narration. The narrator I used is my historical adviser, Longin Szymanski, who also narrated my 3D animation Smok Wawelski. I visited his house, with the story / narrator's script and recorded his voice on digital video. The voice recording was then edited, cutting it up into particular scenes, and placed them accordingly in Adobe After Effects 4.0.
Once the entire presentable prototype was fully constructed within Adobe After Effects 4.0, I rendered out the final scene as a .jpg sequence, and rendered out the sound as an .avi movie. I then imported and arranged the image sequence and sound file in Adobe Premiere 4.2 and created an .avi movie file using the Bravado video card, so that it could be output to PAL television and video. Once this was rendered I then played the fully completed presentable prototype of the pilot episode Lech, Czech & Rus, which was output to a VHS video recorder and a television video monitor and recorded it on VHS video tape.
The VHS videotape and CD-ROM included with this Honours dissertation is the completed presentable prototype of the pilot episode Lech, Czech & Rus, the first episode in series one of the Legenda series.
8.10 Conclusion
As a result of completing the practical component of the Honours project I have developed a 3D animated series concept and presentable prototype of a pilot episode. By completing a self-reflective case study of the practical design project, I have identified, recorded and described the various stages of the animation process undertaken. These include conceptual development, pre-production, production and post-production, each of which has its own processes and methodology attached to them.
The process undertaken and methodology involved in the production of the prototype pilot episode concept, did not follow one particular pathway, rather it involved working on many overlapping levels.
By recording each stage of the animation process as it was encountered, and describing the methodology applied, the self-reflective case study can be used as a useful reference source for others and myself, as a guide when undertaking animation projects of this type. It is presented as a step by step description, detailing each stage, from concept to screen, discussing problem solutions, methodology, and technical skills applied in the successful completion of an animation as an independent animator.