Honours Project:
An Approach to Independent 3D Animation Production
Bachelor of Arts in Design (with 1st Class Honours)
Part 2 - Self-Reflective Case Study on the 3D Animation Process
Chapter 7 - Pre-Production
7.1 Choosing the Story
The first stage during the pre-production was to choose which story to animate. The fact that a legend, an existing story, was to be animated made it easier in that the story did not have to be written totally from scratch. Another important positive point regarding the pre-existence of the legend is that the basis and essence of the story is not owned by anybody, although copyright does apply to the form of words of published versions.
Through research I found out that the Lech, Czech & Rus legend is shared by four Slavic peoples; Poles, Czechs, Russians and Croatians, as Gy (2002, [Online]) points out. One of the most important aspects of this legend series concept was to present the legends as closely as possible to the traditional storyline. This was challenging because even though I was animating the Polish version of Lech, Czech & Rus legend, there are many different variations of the Polish version.
I compiled a version of the Lech, Czech & Rus legend to work with, by researching variations of the tale, which I collected from various sources, including the Internet, specialist books, and conversations with domain experts. Once familiar with the many variations of the Polish version of the legend, I could study the differences and similarities of each. From that investigation, and from what I intuitively felt to be correct, I created my own adaptation of the legend, combining and rejecting certain aspects of the various versions, so to present the core essence of the story as strongly as possible in tact. The process in which I did this will be described in the following section, 7.2 Story Development and Visualisation.
If a film-maker or writer does not have an existing narrative thread to work with, the Principles of Mythical Storytelling and Character Archetypes, and the The Hero's Journey storytelling model, as described in Chapter 3: The Principles of Storytelling, may be able to help out. I wrote my version of the legend with these theories in mind exaggerating the mythical themes and motifs within the legend. As mentioned above, by animating a legend and incorporating this aspect of the theoretical work into the practical project, I have hopefully gained a better understanding of this concept.
7.2 Story Development and Visualisation
I have undertaken and combined two activities from the Multimedia Design 391 Workbook, the Story and Synopsis, and combined them with my own visualisation exercises, as they are related and work well together. The story development and visualisation exercises include:
- Initial Character Sketches
- Visualising the Story
- Workbook Activity 04a: Writing the Story / Narrator's Script
- Visual Collage
- Conceptual Storyboard Illustrations
- Workbook Activity 04b: Animation Synopsis
The processes involved in each of these activities will be discussed in detail in the following sections.
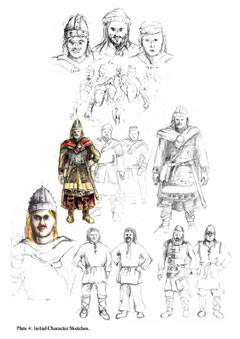
7.2.1 Initial Character Sketches
In order to choose and come up with my own adaptation of the Polish version of the Lech, Czech & Rus legend, a combination of processes and activities was involved, combining visual with written. After gathering and reading the various versions of the legend, I displayed them in front of me alongside visual references of the characters. These visual references included illustrations in books of early Slavic people's appearance and clothing. From these visual resources and inspiration, I drew rough sketches in pencil of the three brother characters; Lech, Czech and Rus, soldier characters, and tribesman characters, paying very close attention to the clothing, armour, belts, weaponry and general visual appearance a warrior would have in that time period [Plate 4]. Calling upon my previous research experience and personal interest in and knowledge of Slavic history, helped considerably in carrying this out.
 |
| Please click here to enlarge image |
|---|
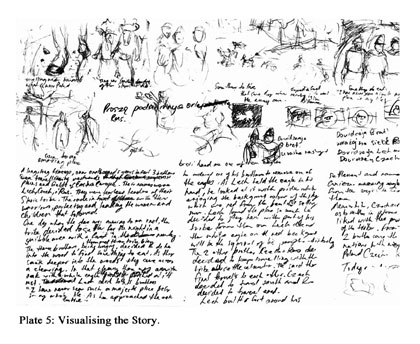
7.2.2 Visualising the Story
After a fair idea of how the main characters would look, the next stage was to map out an adaptation of the legend from all the written versions of the story I had gathered. After taking in all of these existing versions of the legend, I then constructed a version that I felt comfortable with, but instead of writing my own version of the legend in words, I drew it in pictures. I drew and visualised my own version of the legend by sketching all the scenes from the story from beginning to end, taking into account camera angles and scene placement. As I visually constructed a version of the legend I was comfortable with, I then, on the same page wrote a rough written version based on the pictures, as I drew [Plate 5].
As I am a visual person and not a writer, it was easier for me to construct a story visually through drawing and sketching, rather than writing. This is somewhat ironic as the film people one would pitch a concept to, as described in the chapters related to funding and selling an animated work, would in many cases purely look at the written script and documentation, as they are writers. For me drawing and visualising was the main tool for working out the version of the legend to tell to the audience. Both of these initial visual conceptual activities provided the basis of the final character design and environment design.
One of the other reasons why I undertook these visualisation exercises, and especially the visual collage of Conceptual Storyboard Illustrations, yet to be discussed, was that I wished to get back into the art side of things. I strongly felt like making the animation process a free, joyful artistic process, rather than a rigid, technical, tight process. This also somewhat reflects Winsor McCay's philosophy of the art of animation as mentioned in Chapter 2: What Is Animation?
7.2.3 Workbook Activity 04a: Writing the Story / Narrator's Script
After a version of the legend was visually conceptualised, the next stage was to write the text version of the legend on the computer. This would become the foundation of further development work; the synopsis, storyboard, and indeed the base of the story that I was to animate. The story would also serve as the narration during the film. I wrote my adaptation of the legend based on the various versions collected, the visualised sketched story, and the writing that was based on the sketches.
When writing the adaptation of the story on the computer, I set myself up in an inspiring environment, actually playing patriotic heroic Slavic music from a Slavic documentary whilst I wrote. This caused me to think about the soundtrack of the animation, and led me to listen to other pieces of similar music that could possibly be played at certain parts of the film. I thought a heroic and patriotic style of music would suit the and historically important epic legend. The music also helped me to write my adaptation of the Lech, Czech & Rus legend with a lot of enjoyment, passion, emotion and enthusiasm.
The adaptation of the story was written according to my feeling of what actually happened 1500 years ago (I found the period in which the legend is set whilst conducting simultaneous research. See section; 7.3 Thoroughly Researching the Subject Matter). I wrote the legend as closely as possible to the original storyline, with the core essence of the story being strongly presented. See Appendix 1: Workbook Activities to view the Lech, Czech & Rus Story / Narrator's Script.
Later on during the development process I would modify the story, eliminating some unintentional wording and phrasing that was present from the pre-existing versions of the legend I had gathered. I would also add crucial information that was not originally there, such as strengthening various mythical motifs within the legend, reflecting the research carried out in Chapter 3: The Principles of Storytelling.
Thinking about the music that would appear in the film made me take notice about the sound situation in respects to copyright. As the pilot could be used to pitch the series concept to an interested party outside of the educational environment, using other artist's sound or creative property would not be permitted as it would breech copyright law. To overcome this, and to still have a professional quality soundtrack, I would need to acquire a copyright free soundtrack or contact and a professional musician or performer who could create a soundtrack in the style I was thinking of. Possibilities could be music students, or professional artists that I do have means of contacting.
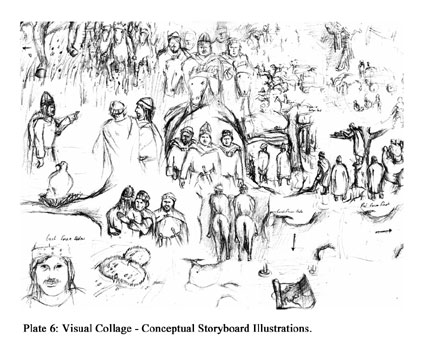
7.2.4 Visual Collage - Conceptual Storyboard Illustrations
After the adaptation of the legend was written on the computer and printed out, the next stage in the pre-production process was to further develop the visual scenes of the animation. I did this by creating a visual collage on a large sheet of paper. The visual collage included illustrations of all the scenes from the new version of the legend from beginning to end, taking into account camera angles, movement and scene placement, in a similar manner to what I did before, although in a neat and finalised manner [Plate 6]. It was my intention that the scenes illustrated in the visual collage would serve as the visuals that would appear in the Conceptual Storyboard.
Due to the amount of visual planning involved and enjoyment of the artistic visual side of the development process, I was thinking of actually painting the scenes of the film on a canvas. This also relates to the fact that some of the visual inspiration came from Polish historical paintings in the renaissance classical painting style. This fact will be touched upon in greater detail in the following chapters.
7.2.5 Workbook Activity 04b: Animation Synopsis
After the Conceptual Storyboard Illustrations were completed, displaying all the scenes on the visual collage, the next step was to create the synopsis. The synopsis was written by simply re-writing the adaptation of the story that I wrote beforehand, in a way that directly describes what is going on in the actual animation, with respect to the scenes displayed on the visual collage. The synopsis was useful for the further development of the film as it was a written document describing technical aspects of the film, including scene layouts, transitions, character movement, object and camera positioning, music and dialogue etc. The information in the synopsis would serve as the basis for the written and technical information that would appear in the Conceptual Storyboard. See Appendix 1: Workbook Activities to view the Lech, Czech & Rus Animation Synopsis.
7.3 Thoroughly Researching the Subject Matter
At the same time whilst working on the Story Development and Visualisation activities, I was also thoroughly researching the subject matter I was animating. The researched everything related and relevant to the Lech, Czech & Rus legend. Some of the research topics included the following:
- Indo-European origins and migrations
- Polish and Slavic origins and migrations
- Polish and Slavic early history
- Polish and Slavic culture
- Polish and Slavic art
- Polish and Slavic folklore
- Polish and Slavic linguistics
- Polish and Slavic anthropology
- Polish and Slavic etymology
- Early European and World history in general
The research involved reading specialist books, thoroughly viewing documentaries, searching the Internet and talking to experts on the subject matter. During this vigorous research I constructed time-lines on Polish, Slavic, and relevant European and World history that included a wealth of information from many different resources. The time-lines assisted me in pinpointing the exact time in history the Lech, Czech & Rus legend, and other legends took place.
From the historical time-line and study of related material, I found out that the Lech, Czech & Rus legend took place sometime in the 6th century AD, being reflective of the Slavic people's mass-migration away from their original homeland, which took place between 200 - 700 AD (ed. Barraclough 1982, p. 33).
This information allowed me to focus my attention on researching the particular timeframe in question, allowing me to find out important information such as what the people's appearance was during that time, their weapons, what language they spoke etc. This research was imperative, especially if the film was intended for public release, I would need the information I was presenting to be absolutely correct.
7.4 Early 3D Modelling and 3D Visualisation
7.4.1 3D Modelling Lech's Face
Note: I have used the single term face to refer to the polygon head/face of the character.
Although I was still in the pre-production stage I began to slowly start the 3D modelling of the project, using the 3D software Kinetix 3D Studio Max R3. I have been using 3D Studio Max software since late 1998. The high-resolution texture maps were created in Adobe Photoshop 5.5 from either using existing image files from the 3D Studio Max World Creating Toolkit R3 CD-ROM (1999) as a base, or creating new ones all together.
I began to model the face of the main character Lech, using an existing 3D face model that I had created earlier on in the year, as a base. It was almost like working with a ready-made lump of clay in the shape of a face in front of me, and all that was needed to do was to carefully shape the form into the desired face I wished to have. During this process, I only modelled and worked on half the face, creating a cloned instanced mirror for the other half. This saved a great deal of time, literally cutting it in half, as whatever modification I did to one half of the face mesh, would also instantly appear and be mirrored on the other half. When finished, I welded together the two halves of the face into one object.
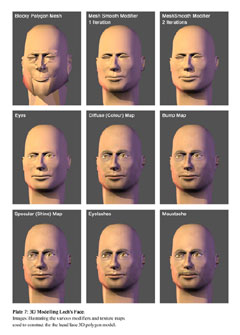
The 3D modelling technique used for the creation of the face, and bulk of the 3D modelling in general, was polygon modelling in a fairly realistic style. Polygon modelling is the technique that I have the most experience in using, usually producing competent results. The way one works in polygon modelling is to work, edit and modify a rough and blocky polygon mesh in order to create a desired shape or form. Applying a mesh smooth modifier on the mesh creates more resolution in the polygon faces, therefore smoothing the object out [Plate 7].
 |
| Please click here to enlarge image |
|---|
I modelled Lech's face loosely using the Initial Character Sketches as reference. The only visual references I used to model the form of the human face was looking at my own face in the mirror, and at an image of a 3D modelled human eye (Lynch 2002, p. 7). Though, for most of the face modelling process I just let it flow, not using any reference as I could tell if the human face 3D model looked correct or not.
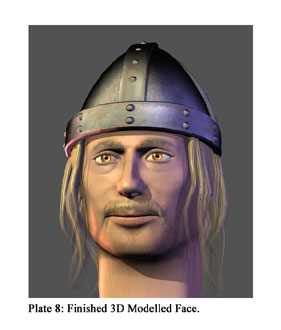
The Lech face 3D model, was one of the best 3D models I had created so far in my experience of 3D modelling and animation up until that point, including fine details such as eye lashes, eye ducts, teeth, gums and tongue. The skin texture was also worked on quite extensively, originally based on a pre-existing image map from the 3D Studio Max World Creating Toolkit R3, although modified in Adobe Photoshop 5.5 enough to be unique. The skin face texture comprised of 4 image maps; the diffuse (colour) map, which was he basic colouring of the face, bump map, that would give the illusion of surface texture and bumps, and two specular (shine) maps [Plate 7].
I was especially pleased with the outcome of the quality of the eyes I had created. It was important to get the eyes perfect due to the fact that the eyes are the centre of attraction on a human face. One of the reasons why the eye resulted in looking quite realistic is due to the fact that the 3D eye model was created, actually reflected how a human eye is actually constructed, with the pupil, iris and outer membranes etc.
During the creation of the face, the main problems encountered was how to construct the hair, and in particular the moustache. Initially I did not know how to construct the moustache, as I could not decide upon whether to make it as part of the texture map, part of the actual face model, or a separate object altogether. I would seek advice from my supervisor in this case, and it confirmed of my own feelings that I should create the moustache as a separate object with its own unique texture map, as I did for the characters in the Smok Wawelski animation.
Animating the legend subject matter again in Lech, Czech & Rus, also meant that I was able to reuse and rework certain 3D models from the Smok Wawelski film, cutting down a great deal of time and effort. Once finished, I would also use Lech's face as a base for other characters in the film, although slightly modifying them enough to be unique.
The next work undertaken on Lech's face was the creation of the moustache, the warrior helmet, and hair of the character. The hair needed a special emphasis on the texture mapping and transparency, as found out from tutorial exercises, the one that helped the most being 3D Hair Tutorial by Comet (2000, [Online]). I did not have to create the full head of hair as luckily the helmet was covering the top part of the head. When modelling the helmet I was happening to be watching a documentary The Slavs, immersing myself in my passions, which gave me a great deal of drive and inspiration.
During this stage, as the face became finished I began to render out images [Plate 8].
Whilst I was carrying out the early stages of 3D modelling, I was also researching Polish, Slavic and European history, and working on the time-lines, as previously mentioned. Part of this research involved looking at historic art books that contained classical Polish paintings, some of which were paintings of legends. Examples include Śmierć Wandy (Death of Wanda) by Aleksander Lesser (Walek 1987, p. 14) [Plate 9], Pielgrzymi u Piasta (Pilgrims visit Piast) by Korneli Szlegel (Walek 1987, p. 13) [Plate 10], and Obiór Piasta (Welcoming of Piast) by Franciszek Smuglewicz (Maslowski & Siuchninski 1962).
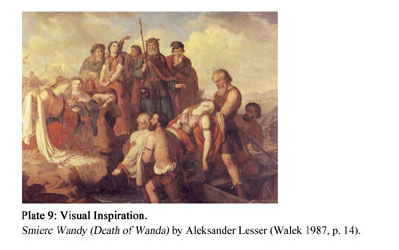
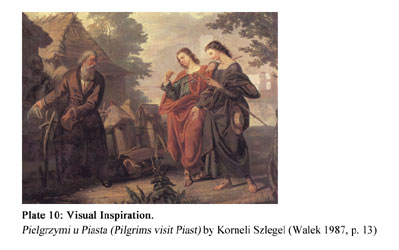
Being interested in art I admired the detail of the paintings, in particular the characters faces. By coincidence, the detail of the rendered 3D Lech face reminded me of the imagery of these classical and renaissance style paintings. Due to this similarity I then decided from that point on to use 3D modelling to capture the realism of these classical paintings.
7.4.2 Level Of Detail
From my previous experience in animation, I have come to realise the level of detail one creates in their 3D modelling is a very important factor, effecting time, effort and end results. Through my experience, I have learnt that one should only use the level of detail that is necessary. The importance of determining the level of detail is also a point expressed by Kelly (1998), who describes several Character Design Guidelines one should consider when creating characters for animation. Among the factors that are relevant to this project are; distance and speed.
Kelly (1998, pp. 114-115) makes the point that the distance a character is in relation to the camera is very important in determining the detail needed. For example, if the animation requires close-up shots, then the detail will need to be higher in a character, than it would be if a character were merely occupying a small amount space in the background. The 3D model of Lech's face has a fair amount of detail due to the fact that there will be close-ups of the characters' faces in the film. I created the detail of the face model with this in mind, knowing my skills and time would not be to wasted, as the audience will be able to view the detail without being obscured by distance. When the character's faces are close to the camera, two iterations can be used on the mesh smooth modifier, resulting in higher polygon detail and smoothness. When the character's faces are in the distance, one iteration can be used, resulting in lower polygon detail and reduced render time.
Kelly (1998, p. 115) also makes the point that the speed the objects are moving within the animation are equally important factors to consider. If the character is performing a fast action in the animation such as running, then the inclusion of motion blur may be able to cover any modelling imperfections. Speaking from experience, an example of how important this point is, can be illustrated in the problem encountered in the Advanced 3D Animation Project 392, Force One Action Figures, which I completed in 3rd year Bachelor of Arts Degree in Multimedia Design. In the project I modelled the soldier characters with a considerable amount of detail, but when these characters where in motion within the battle sequence, all the fine detail was lost due to fast camera movements and motion blur. To a certain extent a lot of my detailed modelling work went down the drain. When creating the Lech, Czech & Rus animation for this Honours project, I have heavily taken these facts into account, hopefully saving time and effort.
7.5 Gaining Facts on Animation Production
While continuing with early production of the practical part of the Honours project, I was also working on the theoretical component, which allowed me to gain useful information related to animation production. During the several meetings conducted with animation expert Alan Thompson, important information was gained about animated series, including information related to pitching and selling a series, the processes one would go through, and the documents one would need. The bulk of this information is displayed in Chapter 4: Funding a Film or Animation Project, Chapter 5: Selling a Film or Animation Concept, and Appendix 3: The Kitchen Wastes: A Case Study on the Creation of an Independent Animated Short Film.
I also gained information from Alan Thompson about formats of television series in general. I found out that the number of episodes per series corresponds with the quarters of the year; 13 episodes equals quarter of a year, 26 episodes equals half a year and 52 episodes equals a full year. This information on series formats also corroborates with knowledge I gained with other Domain Expert in animation. Alan Thompson also gave me an example of how one would pitch a series concept such as mine. These meetings were valuable as it made me view the practical project as an entire series, opening my eyes to aspects such as the series name, premise, and how I would go about pitching it if I choose to do so.
7.6 The Idea of the Series Name
The meeting with Alan Thompson led me to focus on and properly think about the series concept, name, premise and pitch. The first name I initially thought of was; Legends, But True?, from an idea Alan Thompson gave me. This title hinted at the fact that some these legends may in fact have taken place and did include actual historical people and places, reflecting upon the definition of legend stated in Chapter 3: The Principles of Storytelling.
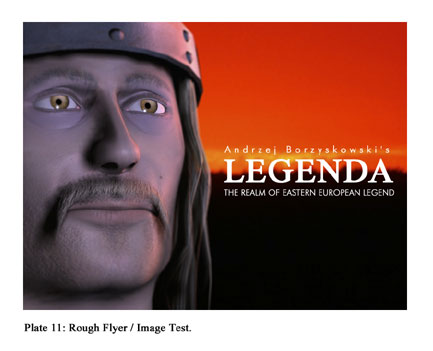
I then thought this name would be a bit too long and drawn out and opted for a short, sharp and direct series name that no one could forget, preferably one word. As a Polish legend is being animated for the pilot, I opened the Polish/English dictionary to find out what the Polish term for legend was. The answer was Legenda. The name stuck straight away and was perfect as I had the feeling that it could be a shared Slavic and Eastern European term, and a good point was that all English speaking audiences, would be able to understand and pronounce it. I added a subtitle under the Legenda title; The Realm of Slavic Legend and constructed a rough flyer / image test, applying the series title on an image of Lech's rendered 3D face, with a red sunset image in the background [Plate 11].
One night before bed during the early 3D modelling stage, I happened to be watching one of my all-time favourite animated short films, 1895 by well-known Estonian animator Priit Pärn. The film, mentioned in Chapter 2: What Is Animation? is about the lives of the Lumière brothers, the inventors of the modern cinema. At the climax of the film, one of the brothers posed a question to the other; 'Can you think of something that hasn't been invented yet?' (1895 1995, [motion picture]). Over the following days and weeks I posed this question to myself and to my friends.
As I was creating the rough flyer I happened to ask myself the question; Can you think of something that hasn't been invented yet, in relation to the series concept? I answered to myself, A Definitive Anthology of Slavic Legend in Chronological Order. The idea stuck straight away so did the notion of using it as the series premise. I decided upon a chronological order of legend as I was creating the historical time-lines and began to see which time periods certain legends took place.
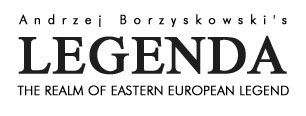
This prompted me to change the idea of just focusing Slavic legends, and I decided to encompass all the cultures of Eastern Europe in the series. The reason for this was to allow the series to be broader and not so specific on just the Slavs. Using the term Eastern Europe to name and describe the concept of the series is also a term all audiences will understand, as opposed to Slavic; a term an audience may not be too familiar with. In the end I decided the series title would be; Andrzej Borzyskowski's Legenda: The Realm of Eastern European Legend. The title of the series uses my name as the singular term Legenda may have already been already copyrighted, and fact that I created the concept.
The Realm of subtitle is reflective and based on the definition of legend given by The Slavs (1984, [video recording]), who states that legend is the hazy dimension midway between fact and fiction, the realm midway between fact and fiction. The single sentence premise, summing up the series would be; A Definitive Anthology of Eastern European Legend in Chronological Order. I then thought about the format of the series, how each 13-part series can focus on one particular people of Eastern Europe, with the first series focusing on Polish legends. At this time I also considered the target audience, and pitching the series as a noble and culturally important body of work, points which will be touch upon in the following sections.
7.7 Thoroughly Researching Legends
After the name and basic concept of the series was decided upon, I set about thoroughly researching Polish legends, folktales and early history on the Internet as that would be the focus of the first series. As I gathered these legends, I constructed another historical time-line: Origins of Poland in Legend, which described in considerable detail, the genesis of Poland in both legends and actual historical events that occurred during in chronological order. This particular time-line helped me and improved my personal knowledge greatly, and allowed me to properly pinpoint the legends in time, more so than the original time-lines. This in tern allowed me to plot and plan out which order the legends would appear in the first 13-part series on Polish legends.
7.8 Workbook Activity 05: Conceptual Storyboard / Storyboard
As stated previously in the section; 7.2 Story Development and Visualisation, the last two Story Development and Visualisation activities that were completed; the Visual Collage - Conceptual Storyboard Illustrations, and the Synopsis, would serve as the basis of visual and written/technical information in the Conceptual Storyboard respectively.
Both Kelly (1998, p. 25) and Kerlow (2000, p. 282) assert that a storyboard is an orderly series of separate pictures, each of which represents a distinct visual sequence or narrative element within the project being developed. Each scene or key moment within the animation should be visually represented within the storyboard. A storyboard can also contain important information such as a brief description of the scene, and information regarding what sound effects, narration, music, camera action and transitions, that appear in each scene.
As I already had the visual information contents created in the visual collage, the next stage was to scan in the pictures from the visual collage into the computer, and separate each scene displayed on the collage into singular pictures. I would rather create the visual imagery for the storyboard in the way I did, with the illustrations of scenes flowing into each other all in one visual collage, rather than rigidly drawing it one by one, box by box, drawing straight from written text.
The creation of the storyboard was also the stage where I was revising the story and synopsis, adding valuable bits of information that I had learnt since, and changed various parts of the text so it was different from the pre-existing versions of the legend I had collected. After this was done, I then created the conceptual storyboard from the written and technical information from the synopsis, and the scenes from the visual collage that were now separated. If I happened to miss any scenes in the visual collage, I quickly drew the missing scenes on paper, scanned them in, and included them in the storyboard.
The storyboard I created was in the same style and layout as used in the animation projects conducted in 3rd year Bachelor of Arts Degree in Multimedia Design. The creation of both a conceptual storyboard and a storyboard also features as an activity in Multimedia Design 391 Workbook. Each storyboard sheet is laid out the same way, representing four boxes, each containing a visual representation of the scene (images from the visual collage) on the right, and the technical information (information from the synopsis) on the left. This includes written description of the scene, information on sound, narration, dialogue, camera movement, and transitions. Also displayed is information on the duration of each scene, time surpassed, and frames each scene contains (according to the 25 frames per second PAL television standard). See Appendix 1: Workbook Activities to view the Lech, Czech & Rus Conceptual Storyboard / Storyboard.
Working out the length of time of each scene and the length of the animation in general was a very important part of the storyboard and the project as a whole. In order to work this out I timed myself reading the Lech, Czech & Rus story adaptation I had written. This was important, as the sound base of the legend would be a narrator. I chose to use a narrator, as it would be a direct way to tell the story to the audience, and the reading of a story reflects how a legend is read. This would also be handy in creating different language versions of the legend. The choice of narrator was also important. In the Smok Wawelski legend, I used the voice of my historical adviser Longin Szymanski. The fact that he had an older Polish accent gave the animation an air of authenticity, reflective of a grandfather telling a story to a group of children.
Since the issue of the timing of a project is required in the Multimedia Design 391 Workbook activities, I timed the narration during the development of my 3rd year Multimedia Major Project Smok Wawelski. This however, turned out to be inaccurate as the reading and timing of the story took place from beginning to end, and did not take into account frames where there was no dialogue. When timing the Lech, Czech & Rus story, the narration for every single scene was timed separately. For the scenes with dialogue, I timed my own voice taking into consideration fades and transitions, and for the frames that didn't have dialogue, I visualised how low long the scene would appear in the film, jotting down the time.
The final time length of each scene, and total time of the whole film so far, was transferred onto the storyboard. The frames needed for each scene were then calculated by multiplying the seconds of the scene by 25 frames per second (PAL television). For example a 5 second scene (x 25) would consist of 125 animated frames, meaning that I would have to animate and render that number, in some cases allowing extra frames for fades and transitions. The running time for Lech, Czech & Rus ended up being correct for the 4-6 minutes episode duration I had planned.
Due to time constraints, and the fact that the majority of the animation represented on it was largely satisfactory, the conceptual storyboard would later become the final storyboard. The storyboard was used to create the animatic, and used as a guide to animate the scenes in the film. See Appendix 1: Workbook Activities to view the Lech, Czech & Rus Conceptual Storyboard / Storyboard.
New ideas and thoughts about the film that came about since the creation of the conceptual storyboard, that would in some cases result in new parts and scenes of the film, would be described in the revised story, synopsis and animatic.
7.9 Final Series Concept
The next stage was to write the Final Series Concept or which was a general description of the film series that could be applied to a flyer and/or pitch document.
The Final Series Concept is to create a series entitled Andrzej Borzyskowski's Legenda: The Realm of Eastern European Legend, which is a definitive anthology of Eastern European legend and folktale in chronological order. The series is part entertainment, part educational and part historical documentary, and will chronicle the legends as closely as possible to the original storyline. The series aims to preserve and maintain part of the cultural heritage of Eastern Europe as well as contribute to the richness of Australia's multicultural society. The series will encompass the legends of the Slavs, the Balts, the Finno-Ugrics and the rest of the diverse cultures that comprise Eastern Europe. The series will consist of four to six minute episodes, thirteen episodes will complete a series, and each series will focus on a particular country and ethnic group of Eastern Europe.
The pilot episode is entitled Lech, Czech & Rus, and would be part of the first series on Polish legends. Lech, Czech & Rus is a shared Slavic legend about the three brothers who founded three Slavic peoples, the Poles, the Czechs and the Russians respectively. The legend is set in the 6th century AD, and is important historically and culturally, representing the Slavic people's great mass-migrations away from their shared ancestral homeland circa 200 - 700 AD.
7.9.1 Why Animation?
In addition to using animation as a tool to maintain and preserve certain aspects of cultural heritage, as previously mentioned, the series uses the medium of animation for a variety of other reasons.
The series uses animation to capture legends as opposed to live-action, due to the fact that legends are only part real. For this reason I believe animation is an effective way to capture this hazy dimension poised midway between fact and fiction. Another reason for the use of animation is related to the fact that the imagery in the series has been visually inspired by the classical, historical paintings of Eastern Europe, which include paintings of legends. The use of 3D modelling is able to effectively recreate the detail and illustrative photo-realism of the imagery in the paintings, and the animation can then give life to this imagery. In respect to this, I am going back to the original Latin word from which animation derives, 'animare', which means 'to give life to' (Wells 1998, p. 10).
An inspirational passage that I found while conducting research for the theoretical component of the Honours project that coincidently relates to one of the reasons why I am using animation, in respect to giving life to pictures, was made by Winsor McCay in 1912:
There will be a time when people will gaze at [paintings] and ask why the objects remain rigid and stiff. They will demand action. And to meet this demand the artists of that time will look to the motion picture for help and the artist, working hand in hand with science, will evolve a new school of art that will revolutionise the entire field (O'Sullivan qtd. in Wells 1998, p.13).
Another reason for the use of animation is that it's an interface specially suited for, and popular with, the traditional audience of legend; children, who are part of my target audience. In respect to the target audience, I have also presented some of my work at cultural clubs, resulting in positive feedback from all age groups; 5 year olds to 70 year olds. The effectiveness of the use of animation in a similar series with a cultural heritage content area can be seen in the case of the 2D animated series Bobtales, which is discussed in Chapter 5: Selling a Film or Animation Concept. See section 5.11.3 The Completion of the Bobtales Series.
7.9.2 Rough Series Pitch Document / Flyer Information
A DEFINITIVE ANTHOLOGY OF EASTERN EUROPEAN LEGEND
IN CHRONOLOGICAL ORDER
The origins of many Eastern European folk are trapped within the hazy dimension between fact and fiction; the realm of legend. Legenda encompasses the legends and folktales of the Slavs, the Balts, the Finno-Ugrics and the rest of the diverse cultures that comprise Eastern Europe.
By chronicling the legends of these cultures, Legenda hopes to preserve and maintain part of the cultural heritage of this part of Europe, at the same time contribute to the richness of Australia's widely diverse multicultural society, as many in Australia's society derive from these ethnic and cultural groups.
Each series will consist of thirteen, four to six minute 3D animated episodes that will focus on a particular cultural heritage of Eastern Europe. The first series of Legenda will focus on the legends of Poland.
Part entertainment, part educational and part historical documentary, Legenda is not only suited for children, the traditional audience of such stories, but for people of all ages from all ethnic and cultural backgrounds. Exploring the ancestry, kinfolk, history, heritage and folklore of the peoples that comprise Eastern Europe, Legenda is brimming with human interest.
7.9.3 (The First 5) Series One Episodes
The Legends and Folktales of Poland: Indo-European > Slavic > West Slavic > Polish:
Episode 1:
6th Century
Lech, Czech & Rus
A shared Slavic legend of migration that tells of three brothers; Lech, Czech and Rus, who founded three Slavic peoples; the Poles, the Czechs and the Russians respectively.
Episode 2:
8th Century
Smok Wawelski
A Vistulan tale about Skuba, the poor but brave shoemaker who saves the town of Kraków from a fierce dragon by concocting a unique and special plan. In return for his deed he gains a valuable reward.
Episode 3:
Late 8th Century
Princess Wanda
A tale about the beautiful princess leader of the Vistulans who in order to save her land and people would rather commit suicide than be forced to marry a German knight.
Episode 4:
Mid 9th Century
King Popiel
The tale about the murderous deeds of an evil ruler and his Germanic wife who meet their demise by being devoured by a pack of vicious hungry mice. Soon after Poland is attacked by Germany.
Episode 5:
Mid 9th Century
The Piasts
Parallel with the Popiel tale, this legend is about Piast; the wheel-maker who becomes the first ruler of Poland. Two mysterious angels enter the town one day, curing Piast's son's blindness, filling the house with never-ending food, and predict great things to come to the family. After the death of Popiel, the Germans attack, and Piast leads the people to victory over the invaders.
7.9.4 Information on the Slavs
As the bulk of the legends will be Slavic, I think it is useful to describe who the Slavs are. The Slavs are a distinct ethnographic and linguistic branch of Indo-European people, in fact the largest in the whole of Europe, as RootsWeb (2002, [Online]) asserts. The Slavs are an Indo-European people as are the Germanic, Italic, Baltic, Celtic and other Indo-European peoples (Early History of the Slavs 2001, [Online]). For 2000 years, all the early Slavs, called Proto-Slavs, lived in the same geographic ancestral homeland; the Slavic Cradle, which The Slavs (1984, [video recording]) states is situated from the Baltic Sea to the Carpathian Mountains. The Proto-Slavs understood each other as they spoke the same language of Proto-Slavonic, the progenitor of the Slavic languages of today.
The word Slav means; to be understood, and derives from the Slavic words slowo and slava; which mean word and glory respectively, as Lénard (1912, [Online]) mentions among other theories. Between 200 - 700 AD, the great Slavic mass-migrations spread the Slavic peoples into the areas in which they live today (ed. Barraclough 1982, p. 33). This occurred due to the shifting of other peoples, namely the Germanic tribes who went to fight the Roman Empire (Early History of the Slavs 2001, [Online]), and the arrival in Europe of nomadic barbarians from central Asia (The Slavs 1984, [video recording]).
The Slavs (1984, [video recording]), asserts that historically, the Slavic nations played a crucial role in European history, their kingdoms acting as a bulwark for the whole of European Christendom and civilization, bearing the brunt of barbarian, Tatar, Turkish, and other infidel onslaughts and invasions.
Today, the Slavs are divided into three groups, depending in which geographic areas they settled post mass-migrations. By the 9th century, the Slavic languages began to differentiate from one another, creating the Slavic languages of today, as Early History of the Slavs (2001, [Online]) mentions. From knowledge gained through several years of research, the three Slavic groups are; The Western Slavs which include Poles, Czechs, Slovaks and (Lusatian) Sorbs (Sorbs are an East German Slavic peoples, situated in the German region of Lausitz or Lusatia). The Eastern Slavs include Russians, Belorussians, Ukranians and Ruthenians (also called Rusyn). Finally, the Southern Slavs include Slovenes, Croats, Serbs, Macedonians, Bulgarians and Bosnjaks (Bosnjaks are Muslim Slavs).
To learn more visit my research website The Slavic Ethnogenesis: http://www.andrzejb.net/slavic/
7.10 3D Modelling and Animation Experiments
7.10.1 Facial Animation and Morphing Experiments
Note: I have used the single term face to refer to the polygon head/face of the character.
After deciding upon the Final Series Concept, I began to learn the new 3D modelling and animation techniques that I would need to use in the Lech, Czech & Rus animation, which was morphing for facial animation, and how to animate a horse.
The facial animation I was originally going to use was sub-object animation, where I would choose certain vertices in the face and move them separately. With the detail of the 3D model, and the amount the character was going to move and talk in the animation, this would have proved almost impossible. I decided to put some time aside to learn how to use morphing for the facial animation, which is professional, cleaner and quicker.
Morphing for facial animation is where copies of the original face model one wishes to animate are made, and each of them copies is modelled and modified in order to show a different facial expression. A morphing modifier is then applied on the original untouched face, and the other faces with different expressions are then attached to, acting as morph targets. Once set, animation is then controlled by sliders that allow each facial expression to morph into one another in a seamless and smooth way.
I used Lech's face to test out the morphing technique, but firstly I had to solve the problem of attaching the moustache to the face, so I would have one singular object to animate, rather than two objects. After much trial and error, I was successful in creating a Boolean compound object out the face and moustache, which is the combination of two objects into one. This problem was not fully resolved by any means, and would be thoroughly investigated, solved and perfected later on during the production process, which is discussed later on in section 8.2.2 Flattening the 3D Face Model.
Once the face and moustache was attached to each other, I then carried out an animation experiment using the morphing technique using Lech's face. It worked very well with pleasing results, being much easier than I had originally expected. At this stage I also experimented in animating the eyes. I did this by creating dummy helper objects that were linked to the eyes. I then applied a look-at controller, so that whenever the dummy objects were moved, the eyes would follow them.
7.10.2 Experiments in Animating a Horse
One of the biggest challenges, which would make or break the whole entire animation project, was to find out how to animate a horse, something that I had not attempted before. This was imperative because the horses would play a large role in the animation, the characters using them for transport. Scenes in the story adaptation that I had written included characters proudly galloping with their horses through the countryside, horses carrying tribesman, and horses walking and pulling carriages.
At this time anxiety and stress levels built up, because the early attempts at animating the horse proved to be an absolute nightmare. Firstly I acquired a horse mesh model from the program MetaCreations Poser 3, a software program that creates ready-made human and animal models for the user. I then attempted to bone the horse with an existing bone structure that was taken from a lion in the CD-ROM accompanying the tutorial book titled 3D Studio Max 3 Professional Animation (2000). The attempt failed, seeming downright impossible. I wasn't even able to bind the bones to the skin.
I then decided to scrap the boning and attempted to animate the horse through separating each section of the horse mesh into body, upper leg, lower leg, and hoof. I then adjusted the pivot points of each section, and linked it through hierarchy. I then animated a running horse movement through key-frame animation utilising inverse kinematics. This time I was able to animate the horse, though the results were not at all desirable, the horse movement looking like a robot rather than an organic creature.
After my unsuccessful experiments, I decided to leave animating the horse for a later time, deciding to concentrate on other matters. Seeking help in how to animate a horse, from a person familiar with animal animation was never an option to me, as I saw that as a cop out. I wanted to solve the problem myself. Nevertheless, it was imperative that I leant how to do this, or there would be no Lech, Czech & Rus.
7.11 Remaining Workbook Activities
It was at this stage that I completed the remaining activities in the Multimedia Design 391 Workbook that I though would be of benefit to me, as they are designed to help further develop the project taking into account various factors. Before this was carried out I revised the first three workbook activities that I had completed, adding information that I had found out since, such as the final series concept, name, premise and other related information.
The pre-production activities that were undertaken at this stage were:
- Activity 06: Intertextual References
- Activity 07: Characters & Events Meaning List
- Activity 08: Tension, Payoff & Pace
- Activity 09: Screen Direction & Motion Dynamic
- Activity 10: Abstract vs Realistic
- Activity 11: Project Management & Production Checklist.
Descriptions of each of these activities will be outlined in the following sections. These activities would help identify important elements within the film, in some cases resulting in the development of new ideas and scenes, which would be illustrated in a revised story, synopsis, and animatic.
As stated previously, I combined and slightly modified some of the Multimedia Design 391 Workbook activities in certain cases so to be of maximum use. See Appendix 1: Workbook Activities, for the completed Multimedia Design 391 Workbook activities.
7.11.1 Workbook Activity 06: Intertextual References
This activity examines issues in intertextuality, identifying the points within the film the audience would recognise and be familiar with, resulting in them better understanding the film. Hutchison (2002) explains this in further detail in the Multimedia Design 391 Workbook. This activity would lead me to strengthen existing elements within the film and in some cases add new ones. The Intertextual References exercise also gave me an opportunity to identify and strengthen various mythical themes and motifs within the legend, relating back to my theoretical research carried out in Chapter 3 The Principles of Storytelling. The sections of this activity are:
Themes: Identifies and lists the themes that appear in the Lech, Czech & Rus story. It identifies if the audience is familiar with them, and describes them in relation to mythical themes and motifs.
Settings: Identifies and lists the settings that appear in the Lech, Czech & Rus story. It identifies if the audience is familiar with them, and describes them in relation to mythical themes and motifs.
Plots: Identifies and lists the plots that appear in the Lech, Czech & Rus story. It identifies if the audience is familiar with them, and describes them in relation to mythical themes and motifs.
Characters: Identifies and lists the characters that appear in the Lech, Czech & Rus story. It identifies if the audience is familiar with them, and describes them in relation to mythical character archetypes.
Props: Identifies and lists the props that appear in the Lech, Czech & Rus story. It identifies if the audience is familiar with them, and describes them in relation to mythical themes and motifs.
This completed Multimedia Design 391 Workbook activity is displayed in Appendix 1: Workbook Activities.
7.11.2 Workbook Activity 07: Characters & Events Meaning List
This activity identifies and lists the characters that appear, and events that take place in the Lech, Czech & Rus story from beginning to end, and examines what each character and event means in relation to the audience. The activity is carried out on a page with three columns. The first column, Character/Object/Prop/Sound/Event, lists each character or event that happens in the film in order form beginning to end. The second column, Intended Meaning, simply lists what each character or event means. The third column, How is it told?, describes in greater detail how the character or event actually appears within the film, and what it is supposed to show to the viewer. This completed Multimedia Design 391 Workbook activity is displayed in Appendix 1: Workbook Activities.
7.11.3 Workbook Activity 08: Tension, Payoff & Pace
This activity identifies the points in the Lech, Czech & Rus film, where tension exists. Each event in the film where tension takes place is listed and described. The payoff describes how that tension is relieved, and the pace describes how that tension is built up and subsided in terms of speed and movement of elements within the film. This completed Multimedia Design 391 Workbook activity is displayed in Appendix 1: Workbook Activities.
7.11.4 Workbook Activity 09: Screen Direction & Motion Dynamic
This activity lists the major events in the Lech, Czech & Rus film, and describes for each, the movement of the objects, characters, camera, and the reason and significance of the movement. This completed Multimedia Design 391 Workbook activity is displayed in Appendix 1: Workbook Activities.
7.11.5 Workbook Activity 10: Abstract vs Realistic
This activity asks the creator three questions about the project being developed in respect to Abstract vs Realistic. These are: 1) Does the film need to be realistic to work or could it be abstract? 2) Do you have the time, or have the skills, to make the film realistic? 3) Would the film be more exiting or interesting as abstract? Each of these questions are then answered in respect to three criteria; Image, Motion and Sound. This completed Multimedia Design 391 Workbook activity is displayed in Appendix 1: Workbook Activities.
7.11.6 Workbook Activity 11: Project Management & Production Checklist
This activity serves as a plan for the creator of the project to follow during the production stage, and allows the creator to calculate the time available they have to complete the project. The activity is also used as a media breakdown, listing the work that needs to be completed in the production process, such as: 3D modelling, animation, rendering, sound and video etc. The calculated time available is then allocated to each part of the production process needed to create project.
I also included a work timetable with deadlines the animator can follow, and a 3D modelling checklist, detailing what 3D models are finished, what 3D models are currently in progress and what 3D models need to be created. Although, I would not end up using this plan for various reasons, it could serve as a valuable tool to an animator, guiding them through the production process. This Multimedia Design 391 Workbook activity is displayed in Appendix 1: Workbook Activities.
7.12 Conclusion
Completing the Multimedia Design 391 Workbook activities allowed me to have an improved understanding of the animation project, and in some cases resulted in the development of new ideas for the film. I was now ready to begin the actual production stage of the Lech, Czech & Rus film. This included 3D modelling, animation, rendering, sound creation, video post, and creation of an animatic.